DieselBaby (or maybe I should start calling him DieselBigBoy as he's now 3...) got lots of Legos for his birthday. Decided it was time to break out the sewing machine and make some toys sacks to house them in.
Super simple idea. I sandwiched the vinyl between the two layers instead of making all those little seams. Those little seams would have bugged me b/c there is no way I could have lined up the patterns.
The material to make the blue sack came from the remnant bin at the fabric store. Perfect place to pick up little bits of fabric.
I feel more sacks are in our future...
06 August 2011
03 July 2011
getting patriotic
I've been asked to come speak to DieselBaby's class on the 4th of July. Other parents have come to talk about their customs, culture, holidays. So this weekend, DieselBaby and I have decided to make Flag cookies. (Ok, not really decided as it is a tradition** so we had no choice...)
I used this recipe. Usually, I substitute almond extract for the vanilla. Not knowing if there were nut allergies, I chose to go with plain vanilla. The recipe really holds it shape when cooked and it's not too sweet.
** Tradition being, my mom got this cookie cutter in 1976 - a free cutter to celebrate the bi-centennial of the USA. She made flag cookies that year...and every year thereafter.
There is a picture of me on my first birthday eating a flag cookie. On DieselBaby's first birthday, we got a picture of him with a flag cookie too.
In her will, I got the cookie cutter. My sister got the piano.
There is a picture of me on my first birthday eating a flag cookie. On DieselBaby's first birthday, we got a picture of him with a flag cookie too.
In her will, I got the cookie cutter. My sister got the piano.
30 June 2011
pirate time
Since we're living around the world, we didn't get the pirate craze that hit the US a while ago. (or maybe it's just that we don't watch that much TV).
So when MADE had a pirate post, I was like "meh...". Then Jake and the Never Land Pirates came Down Under (29 May 2011). Holy Moly we went pirate crazy.
So for DieselBaby's birthday, I decided to make him a Jake vest. It looks pretty simple - just a blue vest with yellow trim and yellow buttons.
I used the Frontier Vest but added a fold-over collar. Once sewn together, I added a yellow bias tape around the collar (and blue on the armholes). The buttons were made using some of the yellow bias tape, so they match.
To complete the present, I made a head scarf using some red material I had in my stash, eye patch using black felt and picked up some gold doubloons.
ahoy mateys! the gift was a success :)
22 June 2011
14 June 2011
Hiatus...
I've been an absent blogger/crafter.... A recent spill has left my cutting, sewing, typing hand non-functioning. I am now on the mend. I've been fabric shopping....
DieselBaby's birthday is coming up, so I must start making his birthday shirt. I've made his previous shirt (1 - flag, 2 - bus, 3- ???) I'm thinking either firetruck or Cat in the Hat.
16 May 2011
12 May 2011
chevron skirt
Hi SONP-ers! Welcome to my little blog Down Under.
When we moved (nearly a year ago!), I was unable to bring my sewing machine. My darling husband must have been tired of hearing me whine about not being able to sew, b/c I got not ONE, but TWO sewing machines for Christmas. Since it was summer here, I went searching for skirt patterns (my own personal "down with the pants" plan). I stumbled upon Marigold's blog and SONP10. Who'd have thought I'd be contributing to SONP11.
I was trying to think of something new - something not already covered in Marigold's extensive skirt review from last year. That's when I thought about chevrons. I'm seeing them all over blogland. Then my brain started going..."you can't put chevrons on a skirt. a skirt is curvy. it would just look all wonky." Time to prove my brain wrong.
I took my favorite skirt (Lands' End, A-line, side zipper) and drafted a pattern for this project.
For my pattern:
W = waist measurement
A = W/4 (top of yoke)
B = A + 2cm (bottom of yoke and top of skirt)
C = A x 2 (bottom of skirt)
L = length
Cut fabric (I used stretch cotton poplin) - skirt pieces (2) and yoke pieces (4). I couldn't decide if I wanted to use the skirt material or accent material as the waist yoke, so I cut 2 pattern pieces of each fabric.
Don't sew skirt together yet. It is much easier to sew the chevrons on when the pieces are separate. Go ahead and hem both front and back pieces.
Time to start getting the chevrons ready. Using this tutorial as my guide, I made a template (since I don't have a rotarty cutter/ruler). I thought I'd make paper zigzags first since I don't want to mess up with my actual fabric.
Cutting lots of practice zigzags also let me experiment with layouts. Oh the possibilities!!!
Time to get started on the real thing. After a couple goes, I found it easiest to fold my fabric in half and start at the folded edge. This allowed me to cut two layers at once. (Make sure you use the correct side of template - notice one side is not a full pattern).
Now back to sewing the skirt. You can now sew the sides together however you like (I like French seams so there are no raw edges to fray.)
When making the yoke, I would add a layer of interfacing. Not necessary, but it would give the top a little more stability when wearing. (or maybe you don't have a post-baby gut like mine...)
Lots of tutorials out there for zippers. I read a few after my last zipper debacle, then did some trial-and-error.
And now you have a cute, little skirt that is oh so trendy.... My husband said it looked like a Charlie Brown skirt. My co-workers loved it.
COST: $22.35
When we moved (nearly a year ago!), I was unable to bring my sewing machine. My darling husband must have been tired of hearing me whine about not being able to sew, b/c I got not ONE, but TWO sewing machines for Christmas. Since it was summer here, I went searching for skirt patterns (my own personal "down with the pants" plan). I stumbled upon Marigold's blog and SONP10. Who'd have thought I'd be contributing to SONP11.
I was trying to think of something new - something not already covered in Marigold's extensive skirt review from last year. That's when I thought about chevrons. I'm seeing them all over blogland. Then my brain started going..."you can't put chevrons on a skirt. a skirt is curvy. it would just look all wonky." Time to prove my brain wrong.
I took my favorite skirt (Lands' End, A-line, side zipper) and drafted a pattern for this project.
For my pattern:
W = waist measurement
A = W/4 (top of yoke)
B = A + 2cm (bottom of yoke and top of skirt)
C = A x 2 (bottom of skirt)
L = length
Cut fabric (I used stretch cotton poplin) - skirt pieces (2) and yoke pieces (4). I couldn't decide if I wanted to use the skirt material or accent material as the waist yoke, so I cut 2 pattern pieces of each fabric.
Don't sew skirt together yet. It is much easier to sew the chevrons on when the pieces are separate. Go ahead and hem both front and back pieces.
Time to start getting the chevrons ready. Using this tutorial as my guide, I made a template (since I don't have a rotarty cutter/ruler). I thought I'd make paper zigzags first since I don't want to mess up with my actual fabric.
Cutting lots of practice zigzags also let me experiment with layouts. Oh the possibilities!!!
Time to get started on the real thing. After a couple goes, I found it easiest to fold my fabric in half and start at the folded edge. This allowed me to cut two layers at once. (Make sure you use the correct side of template - notice one side is not a full pattern).
Now back to sewing the skirt. You can now sew the sides together however you like (I like French seams so there are no raw edges to fray.)
When making the yoke, I would add a layer of interfacing. Not necessary, but it would give the top a little more stability when wearing. (or maybe you don't have a post-baby gut like mine...)
Lots of tutorials out there for zippers. I read a few after my last zipper debacle, then did some trial-and-error.
And now you have a cute, little skirt that is oh so trendy.... My husband said it looked like a Charlie Brown skirt. My co-workers loved it.
ignore my leg jutting out in a weird direction. I promise it's not really that contorted.
And yes, that is how tan I get in the Land of No-Ozone!
COST: $22.35
1.3 m stretch cotton poplin (navy) $15.50
0.2 m David textiles 'linear stripe' $2.60
zipper $1.50
thread $2.75
Thanks for stopping by!
Linked in at:
the stories of a2z
someday crafts
Nurses Day
Today is Nurses Day (Florence Nightengale's birthday).
Thank you to all my fellow nurses out there in blogland!
11 May 2011
KCWC day4
I was able to sew another pair of pants today. NOT picture worthy though. I used an old pair of my yoga pants to make a quick pair of pants for DieselBaby to have at daycare as back-up.
I thought using pants that already had seams and elastic and hems would be easy peasy. Not so. I think these pants took me longer than any of my previous pants. And these aren't even cute!
COST: free
I thought using pants that already had seams and elastic and hems would be easy peasy. Not so. I think these pants took me longer than any of my previous pants. And these aren't even cute!
COST: free
all material on hand/repurposed
10 May 2011
KCWC day3
Well, day 3 is here and so am I. Can't believe I'm still chugging out clothes for the little guy. Maybe it's the mountain of fabric I have right now.
Big surprise....I did another pair of pants for DieselBaby. This time I added a button-fly. DieselBaby has been working on fine motor skills. He likes doing his zipper on his jacket in the morning.
The pants still have elastic in the waist, so if he has to go RIGHT NOW, he can just pull them off. Although I imagine explaining to a 2 1/2 year old that he doesn't have to do the button is quite tricky.
It was my first time with the button fly, so mental notes for next time.
- don't need to use interfacing - it made sewing the placket (?) and cutting the buttonhole a little hard
- make R front a little wider in the center - so the placket can be centered
next time....
COST: $4.00
Happy sewing
Linked in at:
i heart naptime
skip to my lou
09 May 2011
KCWC day2
EDITED to add: these much be magic jammies. DieselBaby wore them last night and slept until 7:15am! I can't remember the last time he slept this late. He normally wakes up between 5:30-6:00.
______________________________________
DieselBaby needs new pajamas. All his PJs are from before we moved (read almost a year ago). He is a blanket kicker, so this winter, I want him to wear long pants to keep his legs warm.
______________________________________
DieselBaby needs new pajamas. All his PJs are from before we moved (read almost a year ago). He is a blanket kicker, so this winter, I want him to wear long pants to keep his legs warm.
Enter super cute, super soft train fabric. I modeled the pants after the previous ones I made him. Only this time, I used a "pattern"...well, at least some forethought.
I haven't decided if I'm going to hem them or leave them long. If the legs are long, then I can tuck them in his sock. This might keep the legs down and his legs warm. But I don't want him to trip on them when he's walking.
Since I had some material left from my 1/2 meter, I decided to make a shirt.
There wasn't that much material left, so I added the gray band on the bottom. (same material from this skirt/recycled top. I have a ton of material due to a mistake in converting yards to meters + over estimating so I would have enough = TONS of fabric).
COST: $5.50
COST: $5.50
** didn't realize till I was cropping the photos that DieselBaby had used the camera and put little smudgy fingerprints all over the lens...hence the fuzzy nature of the pics.
Linked in at:
Thirty Hand Made Days
08 May 2011
KCWC day1
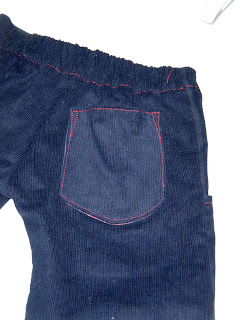
Got up this morning and decided DieselBaby needed some new pants before church (main reason...someone ::DieselDaddy:: forgot to do the laundry). I just so happen to have a lot of fabric lying around, so I whipped up a pair of cool, blue corduroys...
Of course I used the MADE flat front pants (I'm addicted. They look so cute!) Since I started the week out by sewing something for the little guy, thought I might as well join in the Kids Clothes Week Challenge....
COST: $3.85
0.5 m navy corduroy $3.85
elastic - on hand
Subscribe to:
Posts (Atom)